
Your ankle does more work than most individuals give it credit for. Every step you take, every squat you attempt, and every time you climb stairs, your ankle range of motion is what makes it possible.
Yet ankle ROM is one of the most overlooked measurements in fitness and physical therapy. Too little of it leads to knee pain, poor squat depth, and recurring injuries. Stiffness builds slowly and often goes unnoticed for years.
This post covers what ankle ROM is, what normal values look like, how to test it at home, and which exercises genuinely help you improve it.
What Is Ankle ROM?
Ankle ROM, short for ankle range of motion, is the number of degrees your ankle joint can move in each direction. Your ankle is made up of two joints working together.
The talocrural joint is where the tibia and fibula connect to the talus. The subtalar joint is where the talus rests on the calcaneus, also called the heel bone.
Each joint plays a role in the four main ankle movements. Clinicians measure ankle ROM using a goniometer or inclinometer and record the results in degrees.
A restricted reading can point to tight muscles, a bony block, or an old injury that never fully healed.
Active ROM vs. Passive ROM
- Active ROM is the movement you produce on your own using your muscles.
- Passive ROM is the movement a clinician or external force creates for you. A large gap between the two readings often indicates muscle weakness or guarding rather than a true structural restriction within the joint.
The Four Directions of Ankle ROM
The ankle moves across four distinct planes, and each one matters for different activities and daily functions.
1. Dorsiflexion
Video Credit: Physical Therapy Education Solutions
Dorsiflexion is the movement where your toes pull toward your shin. It is the most tested direction in physical therapy and sports performance. You see it in a squat as the knee moves forward over the foot.
It also appears during stair climbing and walking uphill. Without enough dorsiflexion, the heel tends to lift early, and the knee collapses inward.
2. Plantarflexion
Video Credit: Ryan J
Plantarflexion is the movement where your toes point away from the shin. You use it every time you press through the ball of your foot. Heel raises, push-off during running, and calf presses all need plantarflexion.
The normal range is between 40 and 50 degrees. Restriction here often comes from Achilles tendon tightness or posterior ankle impingement.
3. Inversion
Video Credit: Physical Therapy Education Solutions
Inversion is the motion where the sole of the foot turns inward. It happens at the subtalar joint, not the talocrural joint. This is the direction under most stress during a lateral ankle sprain.
Normal inversion ranges from 20 to 35 degrees. Repeated sprains without proper rehab often leave lasting restrictions here.
4. Eversion
Video Credit: Physical Therapy Education Solutions
Eversion is the motion where the sole turns outward. It is the least powerful ankle movement and sits within a normal range of 10 to 15 degrees.
The deltoid ligament on the inner ankle controls this movement. Restrictions here are common in people with flat feet. Those who have had severe ankle sprains often show eversion limitations too.
Normal Ankle ROM Values by Movement Direction
Knowing what counts as a normal ankle ROM reading puts your own numbers in context.
The table below shows accepted clinical ranges for each movement direction, based on standard references from the American Academy of Orthopedic Surgeons (AAOS).
| Movement Direction | Normal ROM Range | Minimum Functional Range |
|---|---|---|
| Dorsiflexion | 10 to 20 degrees | 10 degrees (walking) |
| Plantarflexion | 40 to 50 degrees | 20 degrees (normal gait) |
| Inversion | 20 to 35 degrees | Not formally defined |
| Eversion | 10 to 15 degrees | Not formally defined |
How to Test Your Ankle ROM at Home
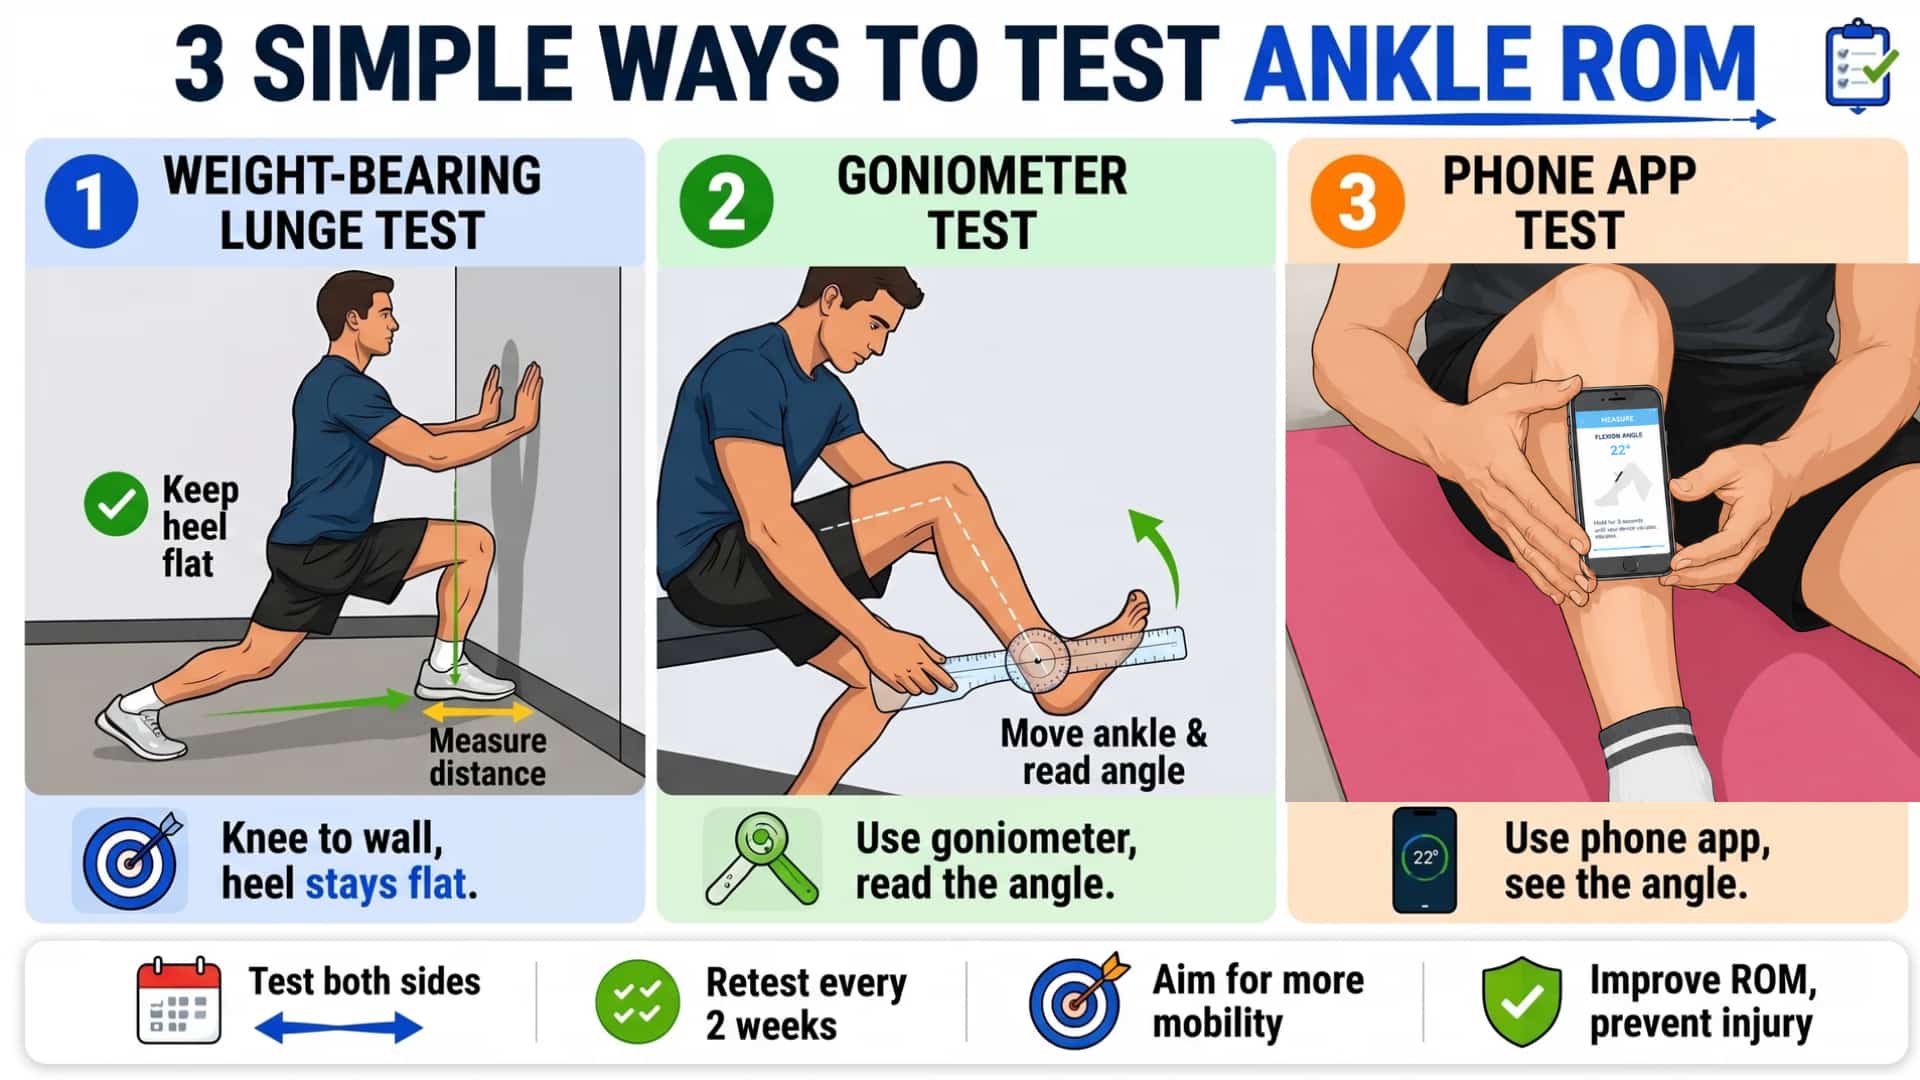
You do not need a clinical setting to get a useful read on your ankle ROM. Three simple methods work well at home, and two of them need nothing more than a wall and a tape measure.
Pick the method that fits your situation. Retest every two weeks once you start a mobility program.
1. The Weight-Bearing Lunge Test (Most Accurate Home Test)
This test measures dorsiflexion in a weight-bearing position. It is widely used in clinical settings and yields results that reflect real movement demands. This is the most practical and reliable home test available without equipment.
How to do it:
- Stand facing a wall with one foot about 10 cm from the base.
- Keep the heel flat on the floor throughout the test.
- Push the knee forward and try to touch the wall without lifting the heel.
- If the knee touches, record the distance and move the foot back 1 cm.
- Repeat until the heel lifts. The last successful distance is your score.
A score of 10 to 12 cm or more is within the normal range. Less than 10 cm points to restricted dorsiflexion. A difference of more than 2 cm between sides is clinically worth addressing.
2. Goniometer Test for Non-Weight-Bearing ROM
This method uses a goniometer, a tool that measures joint angles directly. Goniometers are available at most medical supply stores and are inexpensive. Sit with your ankle at 90 degrees to your lower leg.
Place the goniometer along the outer side of the leg and foot. Move the ankle in each direction and read the angle. This method covers all four directions and gives the most thorough picture of your ankle ROM.
3. Using a Phone App to Measure Ankle ROM
Several free apps turn your phone into a basic inclinometer for dorsiflexion measurement. Place the phone along the shin and perform a non-weight-bearing dorsiflexion movement.
The app reads the angle in real time. Multiple studies support the use of phone inclinometers as reasonably accurate tools for tracking changes in dorsiflexion over time.
How to Record and Track Your Results: Use a notes app or a paper log to record the date, test used, and both-side readings. Retest every two weeks. A gain of 2 or more degrees in four weeks shows your mobility work is paying off.
What Causes Limited Ankle ROM?
Ankle stiffness does not appear out of nowhere. In most cases, one of a small number of causes is responsible.
Start here before picking an exercise. Working on the wrong structure will not produce results.
- Tight Calf Muscles: The gastrocnemius and soleus are the two main muscles that block dorsiflexion when they are too tight.
- Old Ankle Sprains and Scar Tissue: Repeated lateral sprains leave joint capsule thickening and scar tissue that reduce inversion and dorsiflexion.
- Bone Spurs and Ankle Impingement: A bony spur at the front of the ankle limits dorsiflexion; one at the back limits plantarflexion.
- Swelling from Acute or Chronic Injury: Swelling inside the joint physically reduces space and blocks movement in all directions.
- Prolonged Immobility: Two to three weeks in a cast or boot can reduce ankle ROM by up to 30 to 50 percent.
- Less Common Causes: Ankle arthritis, neurological conditions like drop foot, and congenital structural differences can also limit ankle ROM.
Ankle ROM Exercises to Improve Flexibility
Not all ankle ROM restrictions respond to the same exercises. The right approach depends on whether the restriction is muscular, joint-based, or a mix of both.
The exercises below cover all four directions and move from basic stretches to more demanding weight-bearing drills.
1. Dorsiflexion Stretches
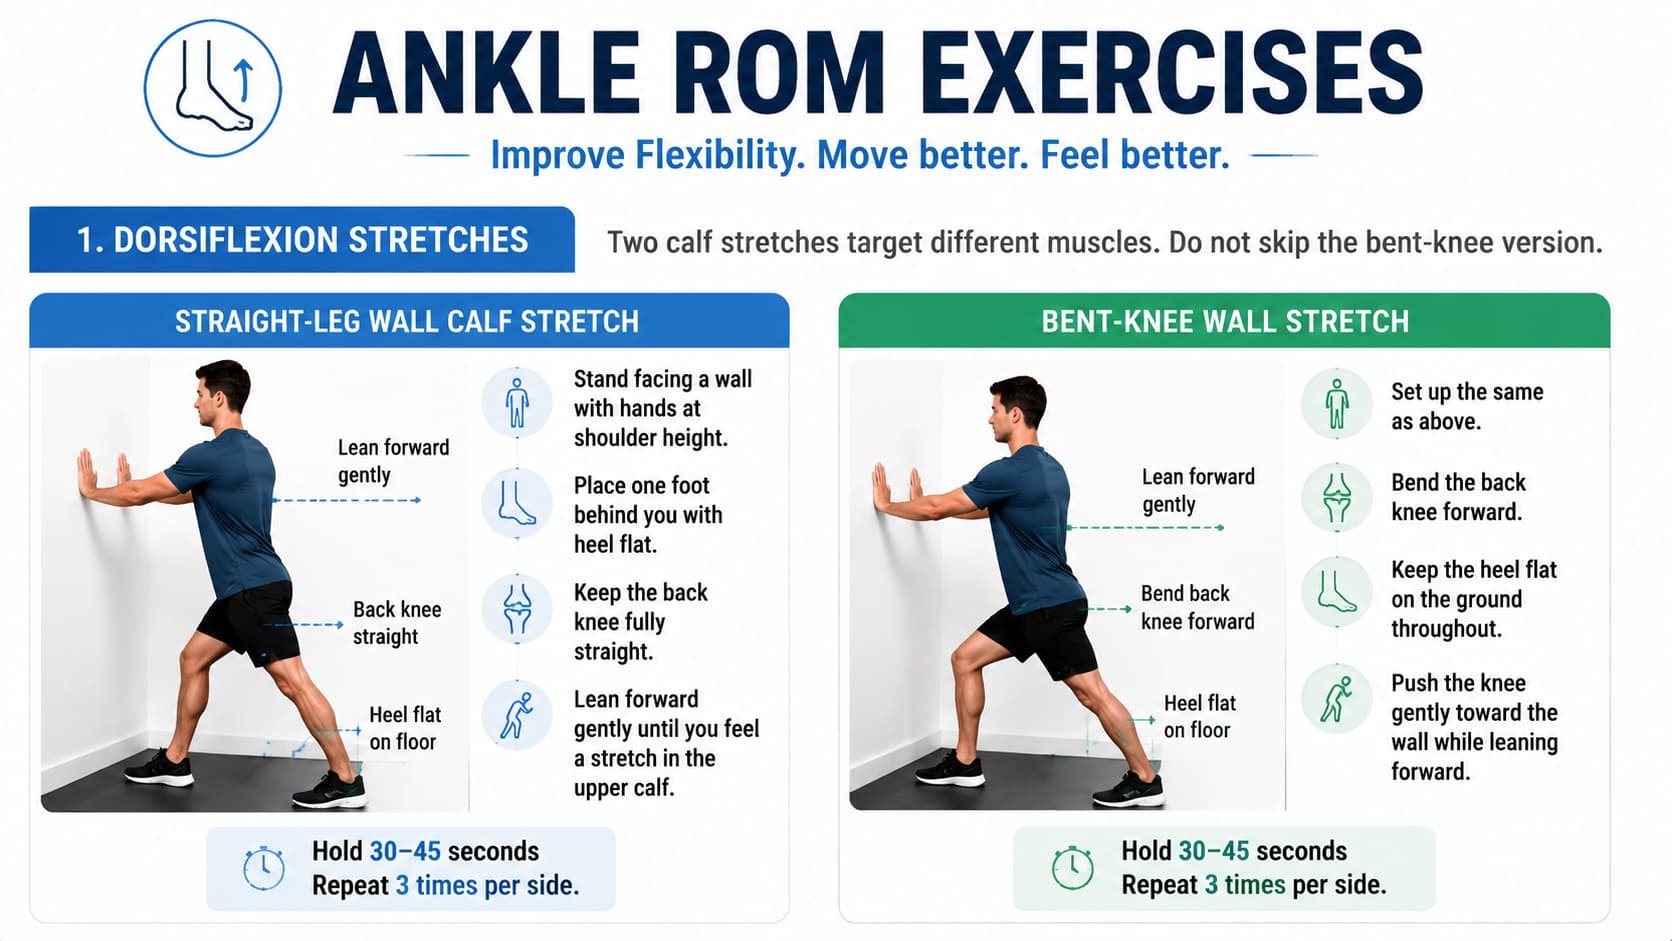
Two calf stretches target different muscles. The straight-leg version hits the gastrocnemius; the bent-knee version hits the soleus. Do not skip the bent-knee version. Many people stretch only with a straight knee and see no change in their dorsiflexion.
Straight-leg wall calf stretch:
- Stand facing a wall with hands at shoulder height.
- Place one foot behind you with the heel flat on the floor.
- Keep the back knee fully straight.
- Lean forward gently until you feel a stretch in the upper calf.
- Hold for 30 to 45 seconds. Repeat three times per side.
Bent-knee wall stretch:
- Set up the same as above, but this time bend the back knee forward.
- Keep the heel flat on the ground throughout.
- Push the knee gently toward the wall while leaning forward.
- Hold for 30 to 45 seconds. Repeat three times per side.
2. Ankle Mobility Drills
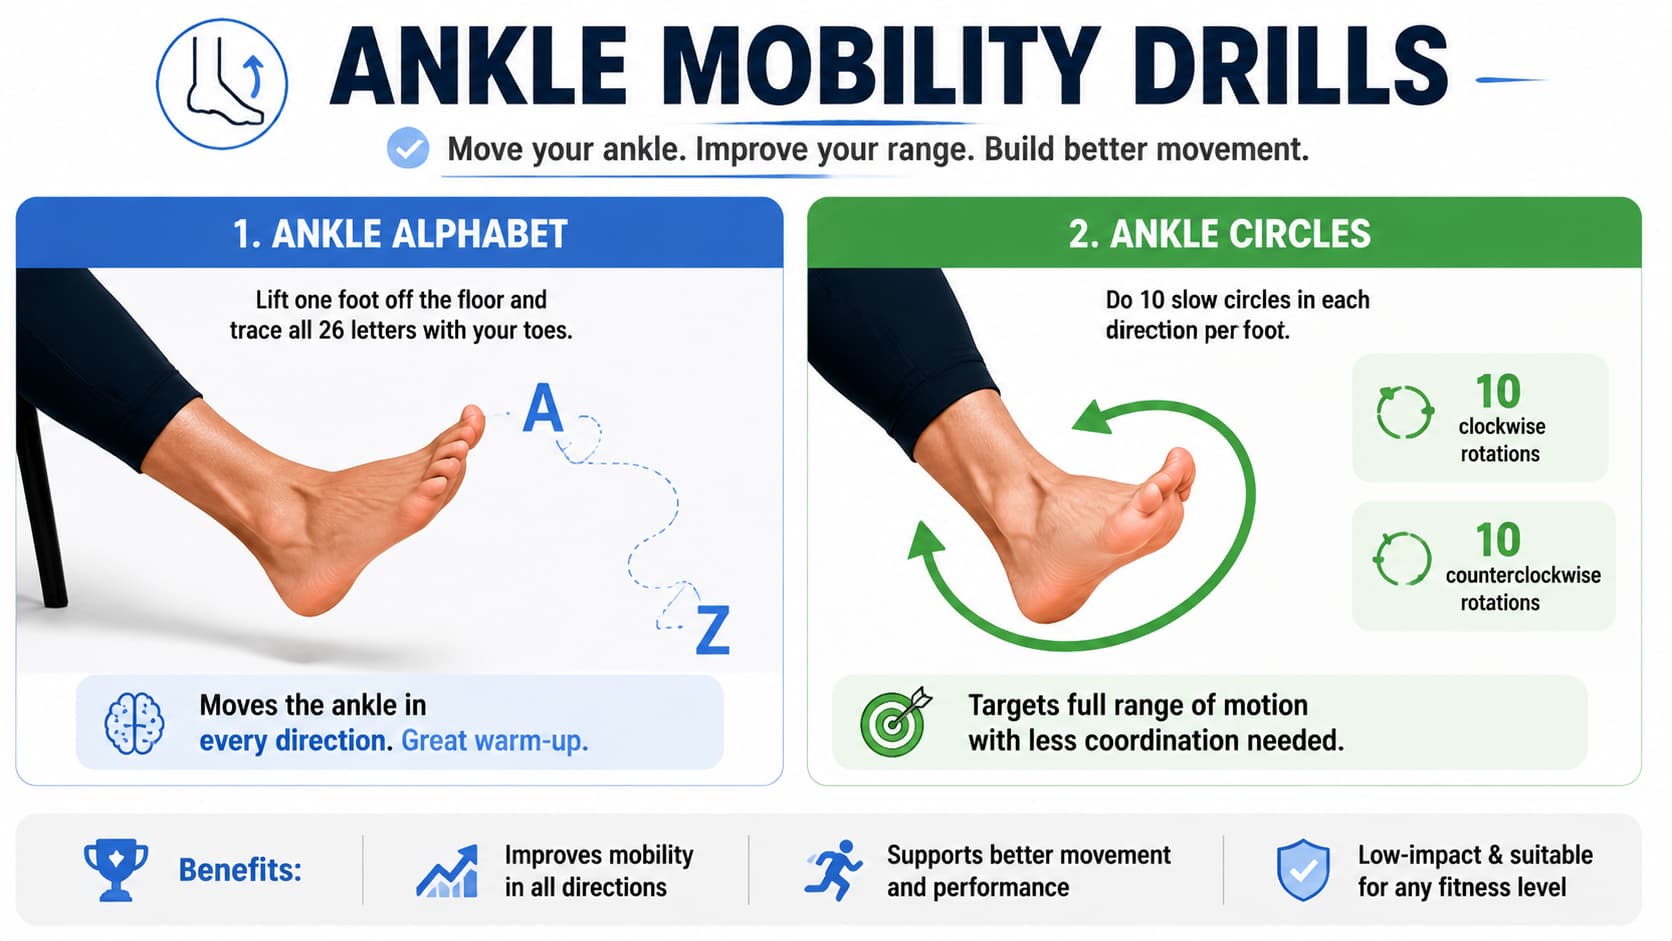
These ankle mobility drills move the ankle through its full range of motion. They are low-impact and work well at any fitness level.
The ankle alphabet is one of the most practical options. Lift one foot off the floor and trace all 26 letters with your toes. This moves the ankle in every direction and works well as a warm-up. Ankle circles, 10 slow rotations in each direction per foot, target the same range with less coordination needed.
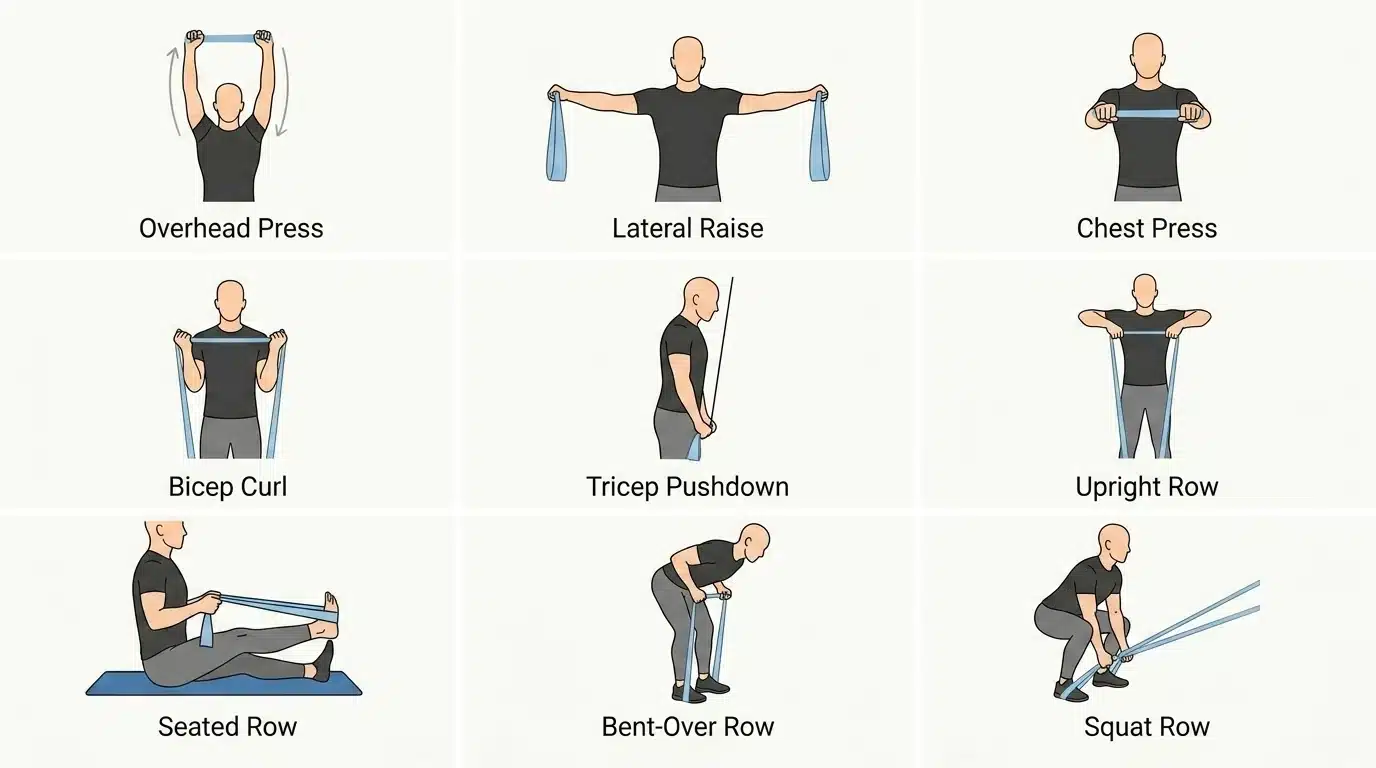
3. Resistance Band Exercises
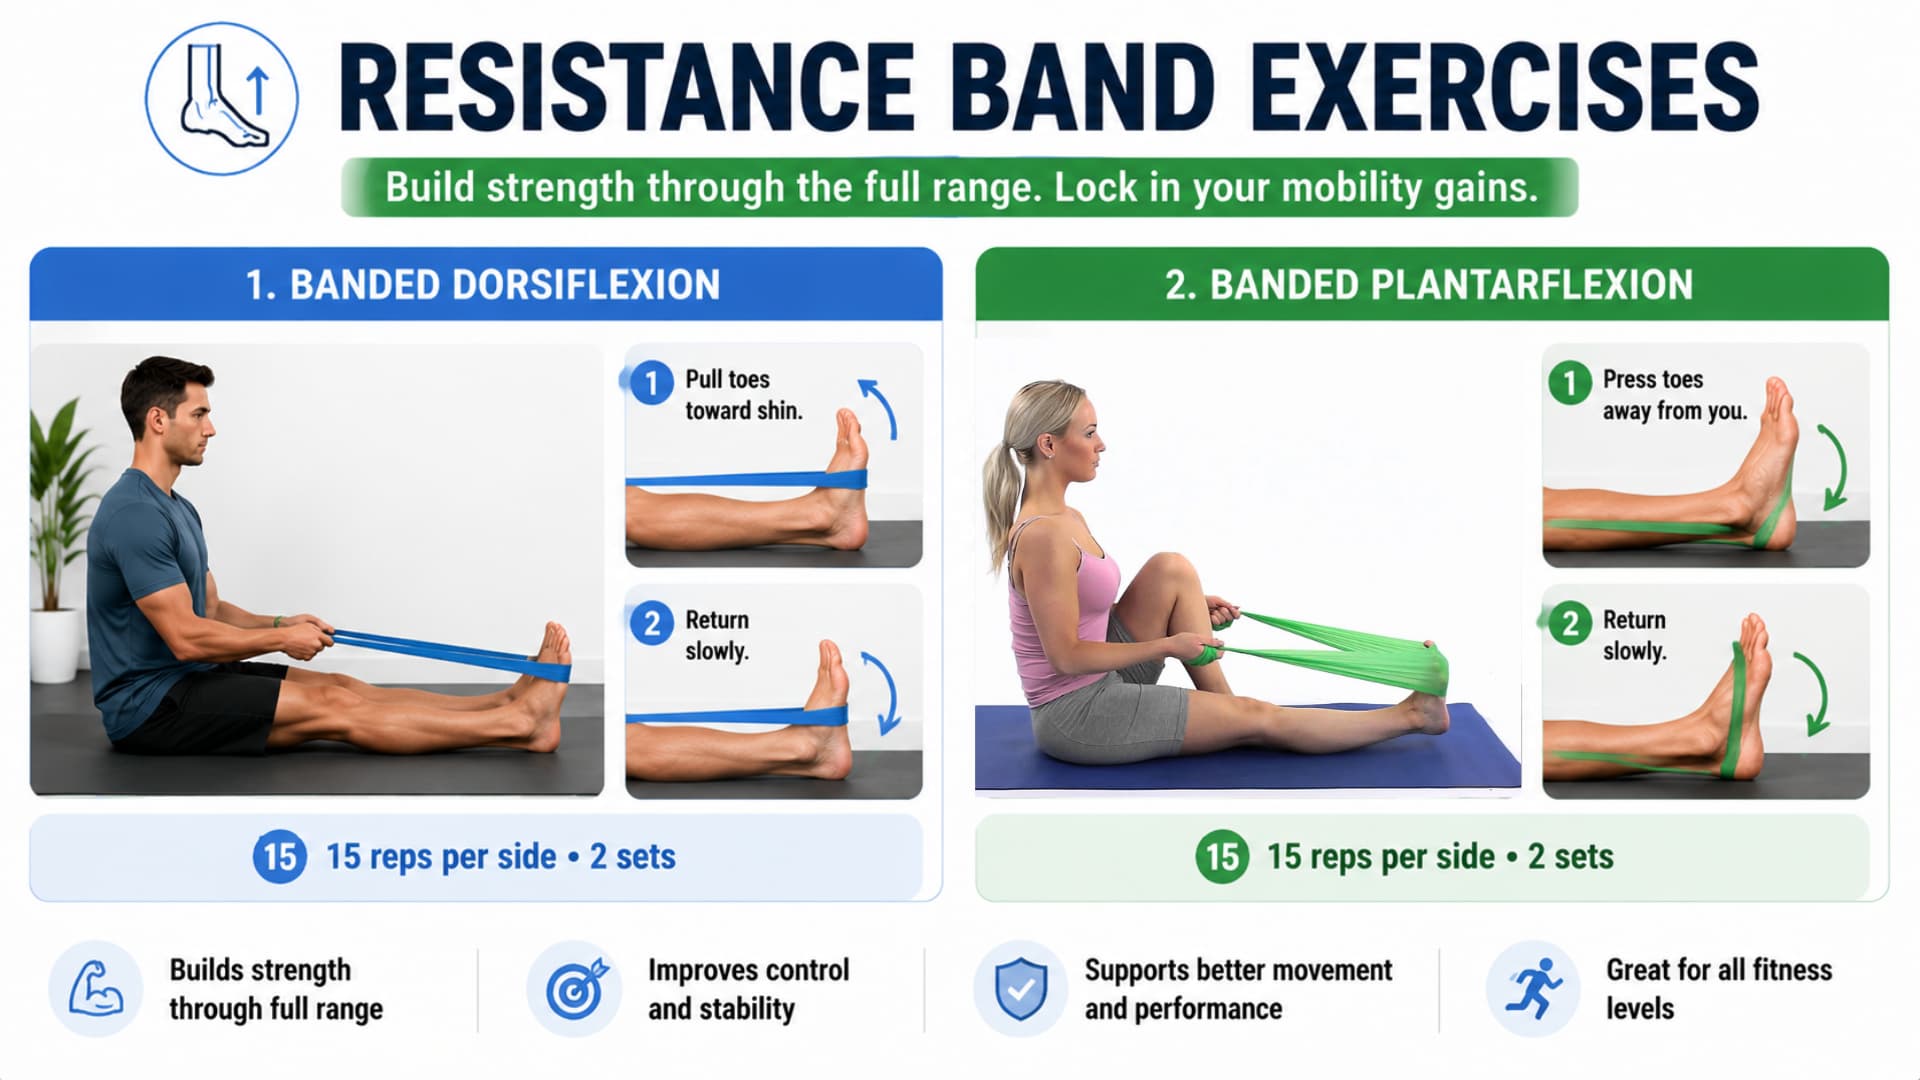
Adding resistance builds strength through the full range, which locks in the gains from stretching.
Banded dorsiflexion:
- Sit on the floor with legs straight in front of you.
- Loop a resistance band around the top of one foot, anchored behind you.
- Pull the toes toward the shin against the band’s resistance.
- Return slowly. Do 15 reps per side, two sets.
Banded plantarflexion:
- Loop the band under the ball of the foot, held in both hands.
- Press the toes away from you against the band.
- Return slowly. Do 15 reps per side, two sets.
4. Weight-Bearing Mobility Drills
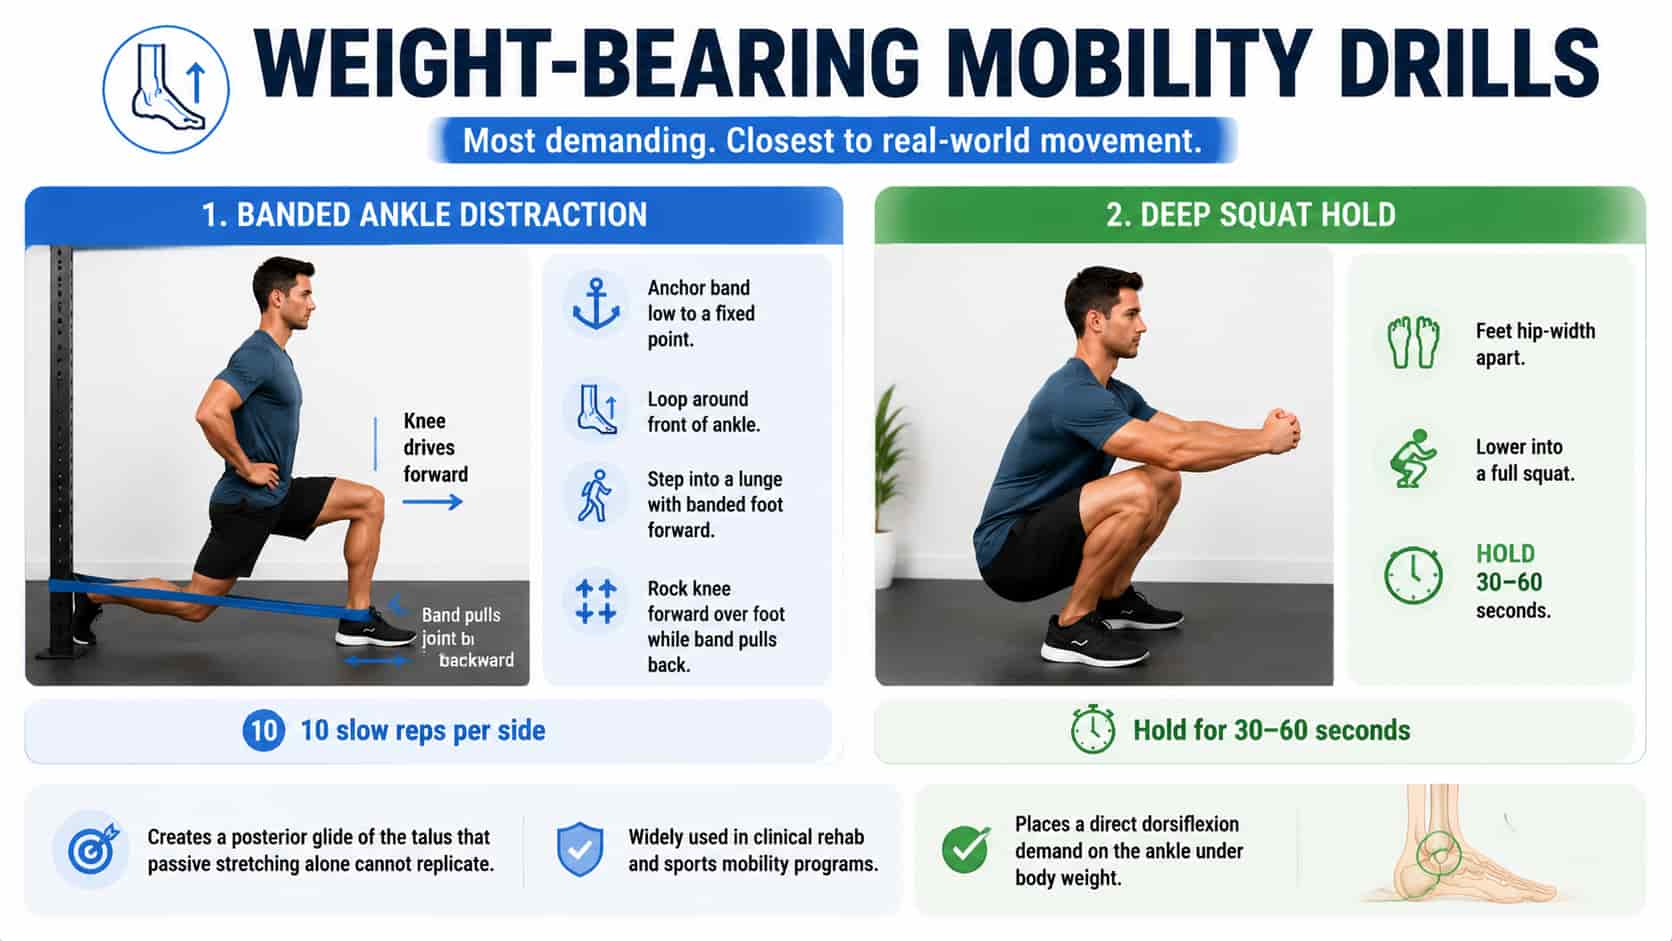
These are the most demanding options and the closest to real-world movement patterns.
Banded ankle distraction:
- Anchor a heavy resistance band low to a fixed point.
- Loop it around the front of your ankle.
- Step into a lunge position with the banded foot forward.
- Rock the knee forward over the foot while the band pulls the joint backward.
- Do 10 slow reps per side.
The band creates a posterior glide of the talus that passive stretching alone cannot replicate. This drill is used widely in clinical rehab and sports mobility programs.
Deep squat hold: Stand with feet hip-width apart. Lower into a full squat and hold with heels flat. Hold for 30 to 60 seconds. This places a direct dorsiflexion demand on the ankle under body weight.
A Simple 10-Minute Daily Ankle ROM Routine
This routine takes 10 minutes and covers the main restriction patterns.
| Exercise | Duration or Reps | Sets |
|---|---|---|
| Straight-leg wall stretch | 45 sec each side | 2 |
| Bent-knee wall stretch | 45 sec each side | 2 |
| Ankle alphabet | Full alphabet on each foot | 1 |
| Banded dorsiflexion | 15 reps each side | 2 |
| Deep squat hold | 30 to 60 seconds | 2 |
Do this daily, or at minimum five days a week. Performing it after a warm-up or at the end of a training session produces better results than doing it cold.
Ankle ROM After Injury or Surgery
Recovery timelines for ankle ROM vary widely depending on the type and severity of the injury. The sections below cover the most common scenarios.
Work within pain limits at all stages. Progress that causes sharp joint pain is a signal to slow down, not push through.
After an Ankle Sprain
- Grade I sprain (ligament stretch, no tear): expect full ROM return within one to three weeks.
- Grade II sprain (partial tear): ROM recovery typically takes three to six weeks.
- Grade III sprain (complete tear): expect eight to sixteen weeks with consistent physical therapy.
- Starting gentle ROM work within 48 to 72 hours typically produces better outcomes than full rest.
- The American Academy of Orthopedic Surgeons recommends early movement as part of ankle sprain management.
After an Ankle Fracture
- ROM work typically starts after cast or boot removal.
- Weeks one and two post-immobilization: gentle active ankle circles and the alphabet within pain limits.
- Weeks three to six: progressive calf stretching and resistance band work.
- Weeks six to twelve: weight-bearing drills and return to functional activities.
- All timelines vary by fracture type, fixation method, and your surgeon’s specific protocol.
- Follow your surgeon’s instructions above this general timeline.
After Ankle Surgery
- ORIF (open reduction and internal fixation): ROM goals depend on the hardware type and the bone-healing status.
- Ankle fusion (arthrodesis): dorsiflexion and plantarflexion are permanently reduced at the fused joint; the forefoot and midfoot compensate over time.
- Ligament reconstruction: most patients return to full ROM by three to four months with consistent physical therapy.
- All post-surgical timelines are set by your surgeon and physical therapist.
- Do not self-guide your recovery after ankle surgery.
How Long Does It Take to Improve Ankle ROM?
Most individuals who stretch daily and incorporate resistance-based ankle exercises see measurable gains in dorsiflexion within four to eight weeks.
Soft tissue restrictions, like tight calves or scar tissue from an old sprain, respond well to consistent work. Bony restrictions, like impingement from a spur, respond slowly.
They may plateau without manual therapy or a surgical consultation. Post-injury stiffness typically takes longer than general tightness, and recovery speed depends heavily on how long the ankle was immobilized.
If the wall lunge test shows no change after six weeks, a physical therapy assessment is worth scheduling.
Realistic Timelines
| Cause of Restriction | Expected Improvement Timeline |
|---|---|
| Tight calf muscles | Two to four weeks of daily stretching |
| Post-sprain stiffness | Four to eight weeks |
| Post-fracture stiffness | Eight to sixteen weeks |
| Bony impingement | Variable; may need clinical intervention |
How to Know Your Program Is Working
Retest with the wall lunge test every two weeks. A gain of 1 to 2 cm in four weeks is solid progress. Functional signs include deeper squat depth, less tightness on stairs, and improved single-leg balance. If numbers are not moving after six weeks, reassess the cause of your restriction.
When to See a Physical Therapist
Some ankle ROM restrictions need professional assessment. Do not delay if you notice any of the following:
- Ankle ROM of less than 5 degrees in any direction.
- Sharp or pinching pain at the end range of movement.
- An audible click or a feeling of locking in the joint.
- Swelling that does not reduce within 72 hours after an injury.
- No ROM improvement after six to eight weeks of consistent daily work.
A physical therapist can assess the joint through hands-on mobilization. They can precisely identify the source of the restriction. Tools like dry needling and instrument-assisted soft tissue work go beyond what exercise alone can do. If a bony block is suspected, they may refer you for an X-ray or MRI.
The American Physical Therapy Association (APTA) provides a therapist locator to help you find a licensed PT near you.
Conclusion
Ankle ROM is one of the simplest things to assess and one of the most rewarding to improve. A few degrees of extra dorsiflexion can change how you squat, walk, and recover from injury.
The normal ranges are clear, the home tests are straightforward, and the exercises work when you stay consistent. Start with the wall lunge test today.
Find out where your ankle actually stands. Then add 10 minutes of daily ankle mobility work to your routine.
Small, regular sessions produce real results. Your knees, hips, and lower back will thank you for the attention you give your ankles.